

How To Create New Email Id In Zoho Mail
- Start Signup
- Add Domain
- Buy Domain
- Payments
- Verify Domain Ownership
- Add users to your organization
- Groups
- Configure Email Delivery
- SPF/DKIM
- Email Migration
- Mobile Access
Signing up
Note:
Apart from the listed paid plans, Zoho Mail also offers a free plan for business email users. If you want to choose a free plan either click here or scroll down the pricing page.
- Note:
- Any further logins to your Zoho Mail account can be done through this mobile number.
- In case you want to change the mobile number you entered previously, follow the instructions given on the verification page.
- If you did not receive the verification code, click Resend code.
- We do not use your mobile number for any advertising purposes.
Add Domain
Using a domain you already own
Purchasing a new domain
- If you don't own a domain, we can help you with purchasing one. Note that this feature is only available for specific data centers at this moment. If you don't find this option, you can simply buy a domain from a provider of your choice and continue to setup Zoho Mail using the Add an existing domain option.
- To purchase a new domain:
Note:
Check the Keep your registration information private option if you don't want your domain details to be visible in DNS lookups.
Payments
- In the Plan Details section, you will be asked to provide details such as No. of User IDs you would like to procure and any add-ons you might require.
- Upon providing the details, click Continue.
- After getting directed to the summary of your order, review the details, and click Confirm.
Note:
In case you need to make changes, navigate to Plan Details, and click the Edit Icon and redo the previous steps. - Upon reviewing your order, you will be asked to provide a billing address and payment details. Provide the required details, then click Make Payment.
- After finishing all the above steps and completing your payment, you will be redirected to the Setup page of your Zoho Mail account or Click Go to Zoho Workplace button.
Verify Domain Ownership
- After successfully adding your domain, proceed to verify your domain. You can choose your authentication method—TXT, CNAME, or HTML, by accessing the drop-down menu.
- Note:
Before verifying the ownership of your domain, check if the domain name you provided is correct. In case of any misspellings or any required changes, click the Edit icon and make the required corrections.
TXT Method
- In order to verify your account using the TXT method, you will need access to your Domain Registrar's DNS page.
- Note:
The screenshots and processes recorded here are from the domain provider—GoDaddy. Your domain registrar's page may look different.
CNAME Method
- In order to verify your account via the CNAME method, you will need access to your Domain Registrar's DNS page.
- Note:
The screenshots and processes recorded here are from the domain provider—GoDaddy. Your domain registrar's page may look different. For provider-specific instructions find this help document.
Organization Setup
Add Users to your organization
- After successful domain verification, you will be asked to provide a name to create the first user of your organization. Note that the first user you create will become the super administrator by default. The super admin will have all the privileges across all users who are added to your organization.
- Upon giving the user name, click Create.

- After adding the super admin, you will be taken to the Users page where you can start adding users to your organization.
- Adding users in Zoho Mail can be done in multiple ways, depending on your convenience.
- Add Users one by one.
- Import Users using a CSV file.
- Invite a user to be a part of your organization.
- Import from G Suite
- Note:
When you add a user, you are creating an individual account for them in your organization. You will be providing the user with a unique email address and password using which the user can access their account.
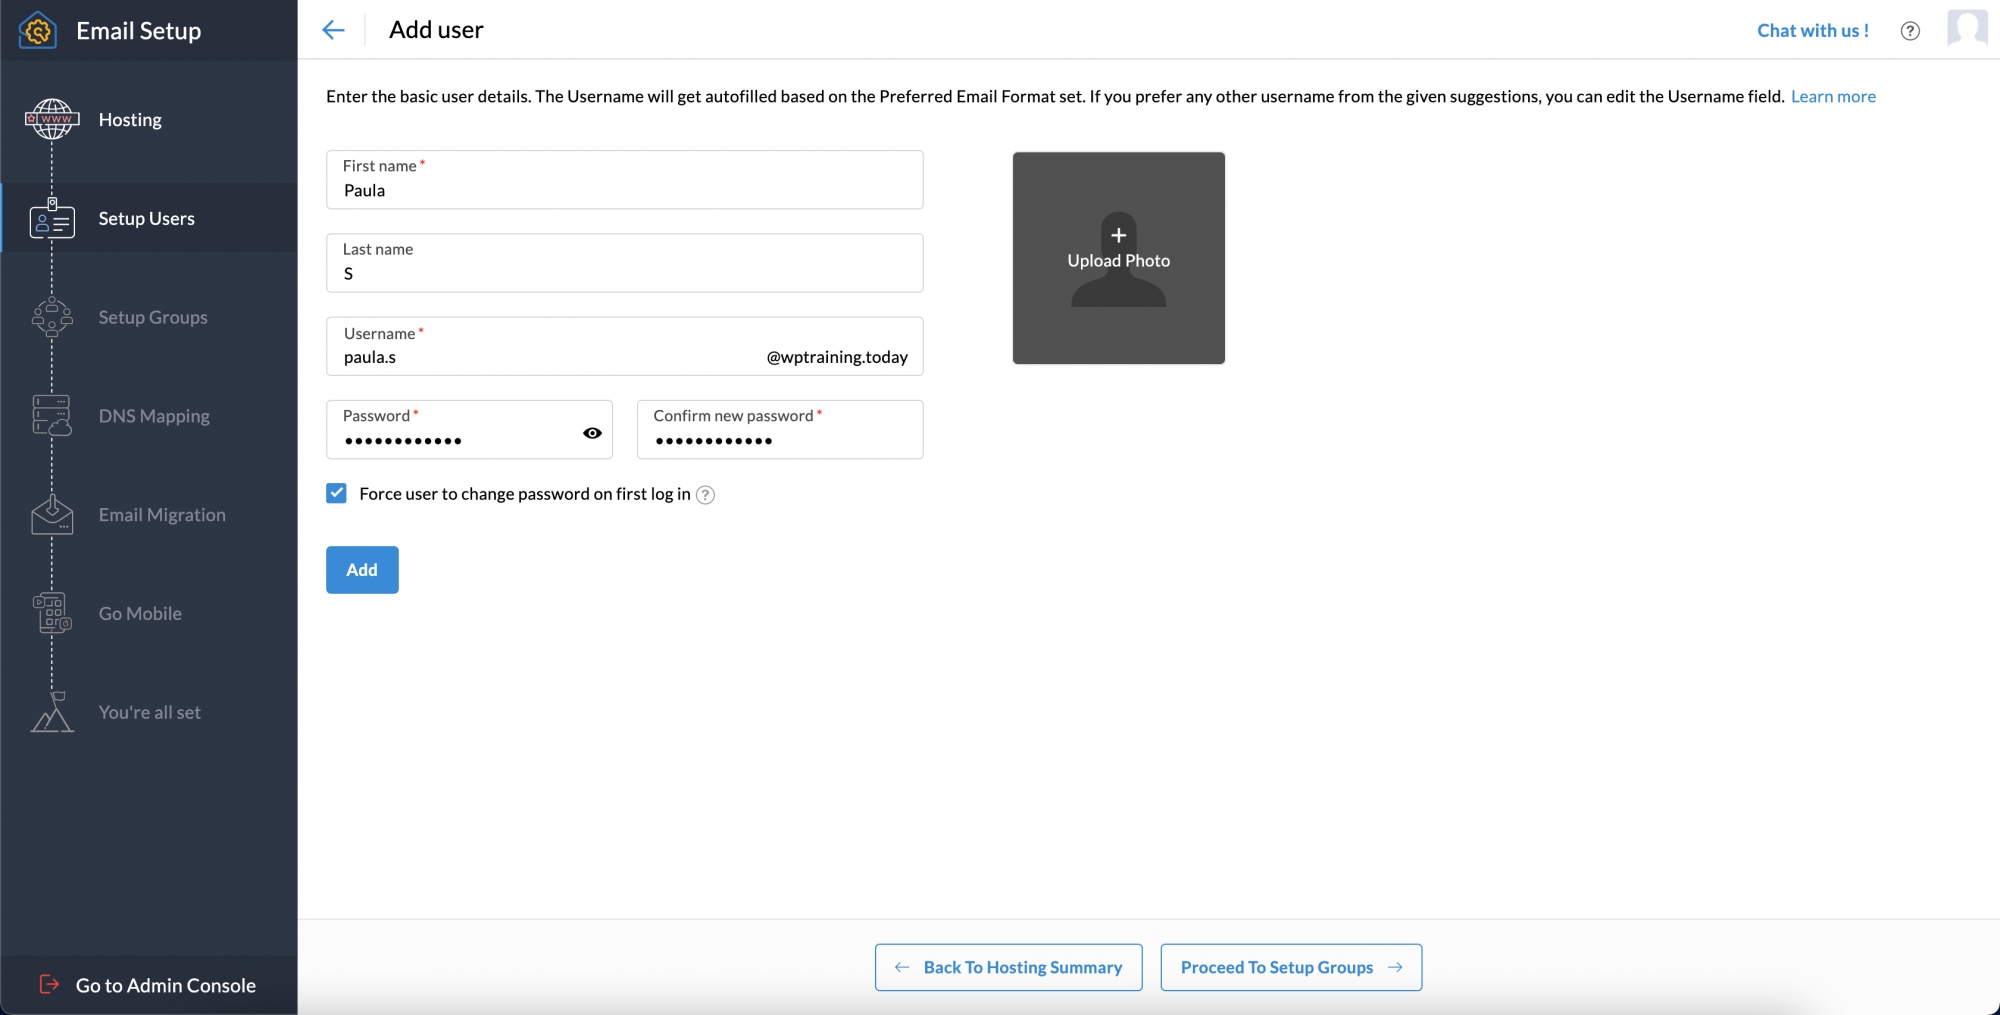
Add User(s)
- Click the Add button.

- Enter the desired first name, last name, and username. You will also be required to provide a password, using which the user can log in later.
- You can also check the Force user to change password during the first login option, according to your security requirements.
Note:
If you check the above option, the user will be prompted to change the password of their account during their first login attempt. The user will not be able to enter or access their account before changing the password. - Click Add to finish creating the user account in your organization.
- Redo the same steps to add as many users as you need.
Import User(s) using .CSV file
Note:
The Username, Password, and First Name fields are mandatory in the .CSV file.
- Note:
- This feature is only available for paid accounts.
- To know more about other methods of user creation, refer here.
Groups
- Groups or Distribution Lists are common email addresses shared by a set of users with a common purpose. When an email is sent to the group account, a copy of the email gets delivered to all the individual members of the Group. To create a group,
- Note:
- You can also choose to skip this step and add groups later. But, if you want to migrate data from other services, it's recommended you create your distribution lists right away.
- To know more about groups, refer to this help document.
Configure Email Delivery
- Mapping your emails to Zoho Mail is one of the most crucial steps in setting up your business email. You need to configure the MX records of your domain in the DNS hosting provider (DNS Manager) in order for the users and groups you've created to start receiving email. MX Records (Mail eXchange) are the special entries in DNS that designate the email-receiving server of your domain.
- Note:
- If you have purchased your domain from us, we will automatically configure your email delivery. In that case, you might not see this step.
- The MX records used below are generic and can change depending on the data center you are using Zoho Mail from. In order to avoid confusion, refer to the records displayed in your setup screen for your domain-specific MX record.
- For detailed instructions on how to add MX records to your domain registrar's DNS, contact their support or refer to this help document.
- The screenshots displayed below are from GoDaddy and they may differ from your domain registrar's user interface.
Generic instructions on how to add MX records:
- Note:
- You have to add all three MX Records.
- It may take an hour or two for the records to get propagated and to be able to receive emails.
- After configuring all the MX Records, go to your Zoho Domain Setup page, and click Verify MX Records.
SPF and DKIM
- Email spoofing is forging an email so that the email appears to be sent by someone other than the actual source. To ensure valid emails from your domain get delivered to your recipient, and to prevent email spoofing, we recommend you add SPF and DKIM records to your domain.
Adding SPF record
- Note:
- For detailed instructions on how to add the SPF record in your domain registrar's web portal, refer to your domain registrar's help document, or contact their support.
- The screenshots attached below are from GoDaddy and they may differ from your domain registrar's user interface.
- The values mentioned below are generic. For your domain's specific SPF value, check your Zoho's Domain Setup page.
- Log in to your domain registrar's web portal.
- Launch the DNS Manager/ Domain Management Page/ DNS Control Panel for your account (this lists all the domains you have registered).
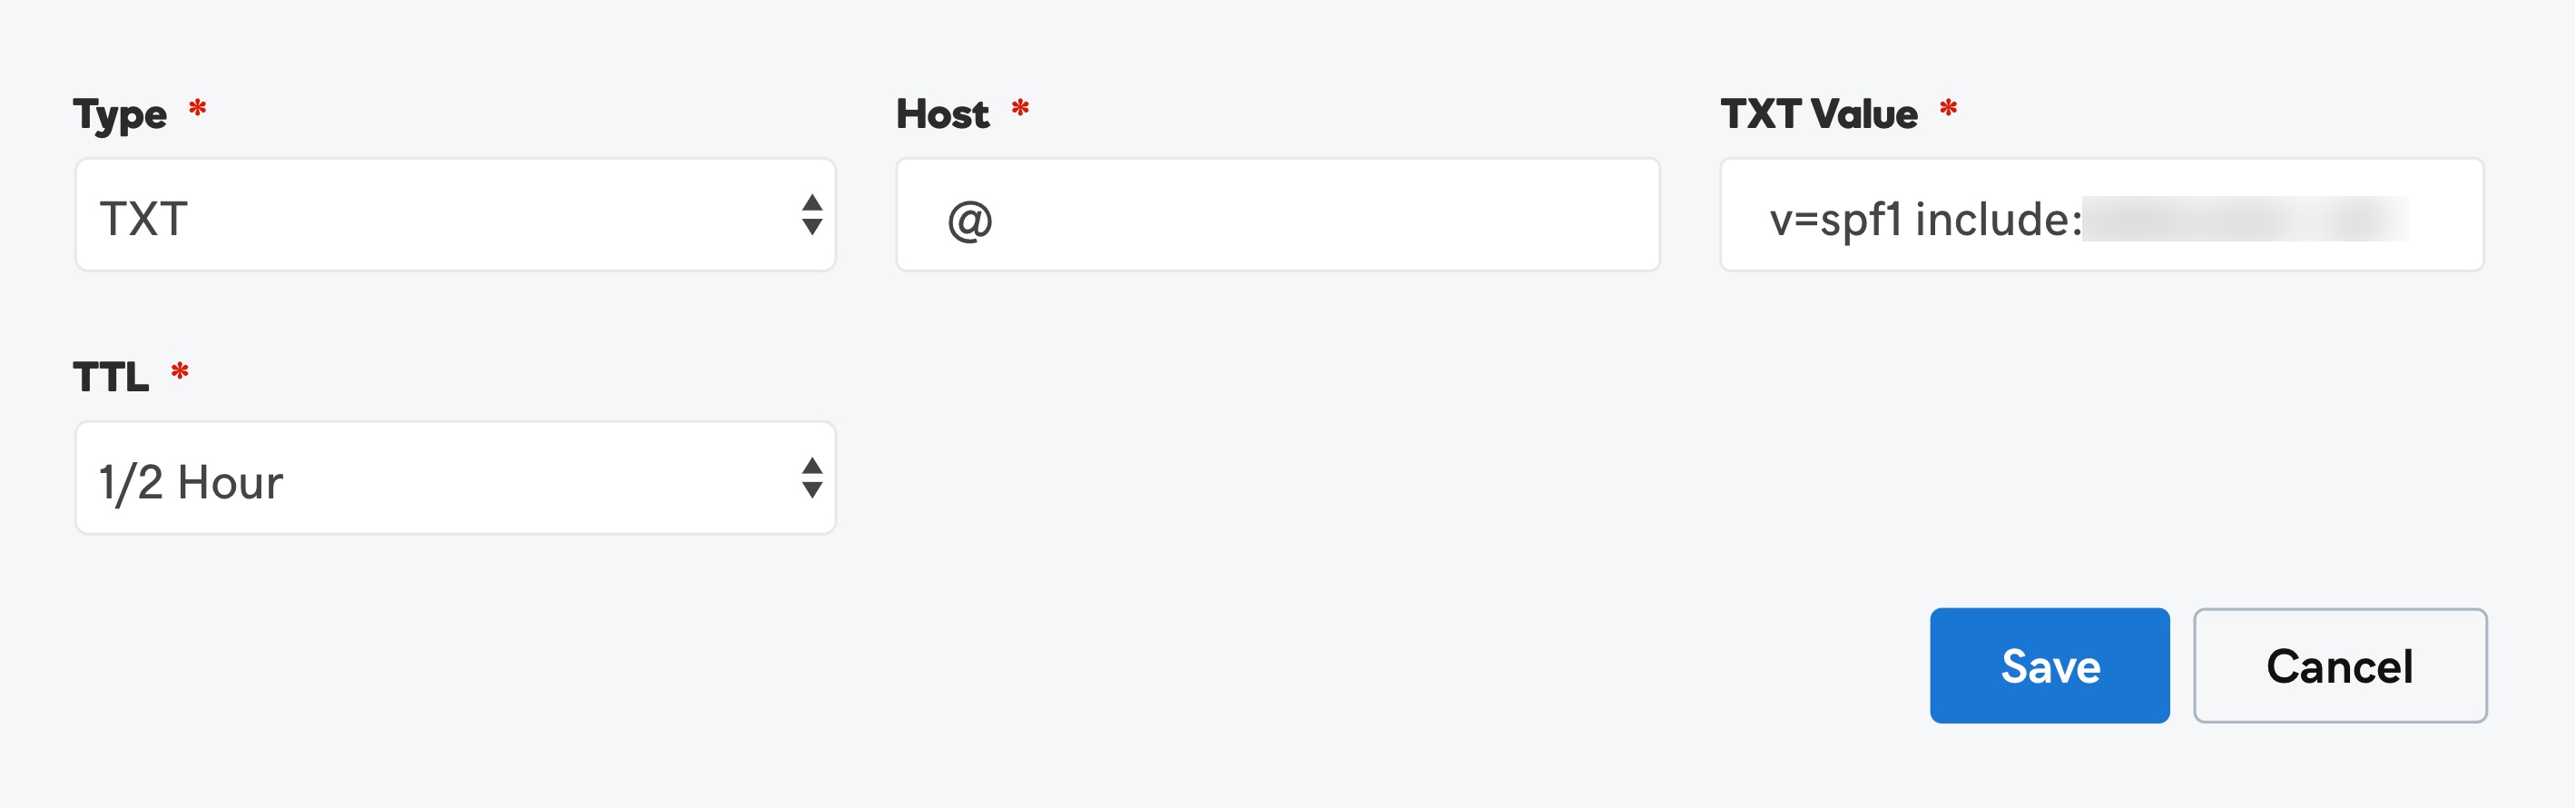
- In the DNS Manager, locate the TXT Records and click Add.
- Specify the Name/ Host as "@."
- In the TXT Value field, enter "v=spf1 include:zoho.com ~all."
- Click Save Zone File, Save, or Add Records to save the changes.
- You would have now successfully added an SPF record to your domain. To check if your SPF record propagated, click Verify SPF Record. It may take anywhere between 4 to 48 hours for your SPF record to propagate.
Adding DKIM Record
- Creating a DKIM signature involves two major steps—one in Zoho Mail and the next in your domain registrar's web portal. In the Zoho Mail domain setup page,
- Click Proceed to Configure DKIM.
- In a new tab, sign in to your Domain Registrar's account.
- Navigate to your Domain Management Page or the DNS record page.
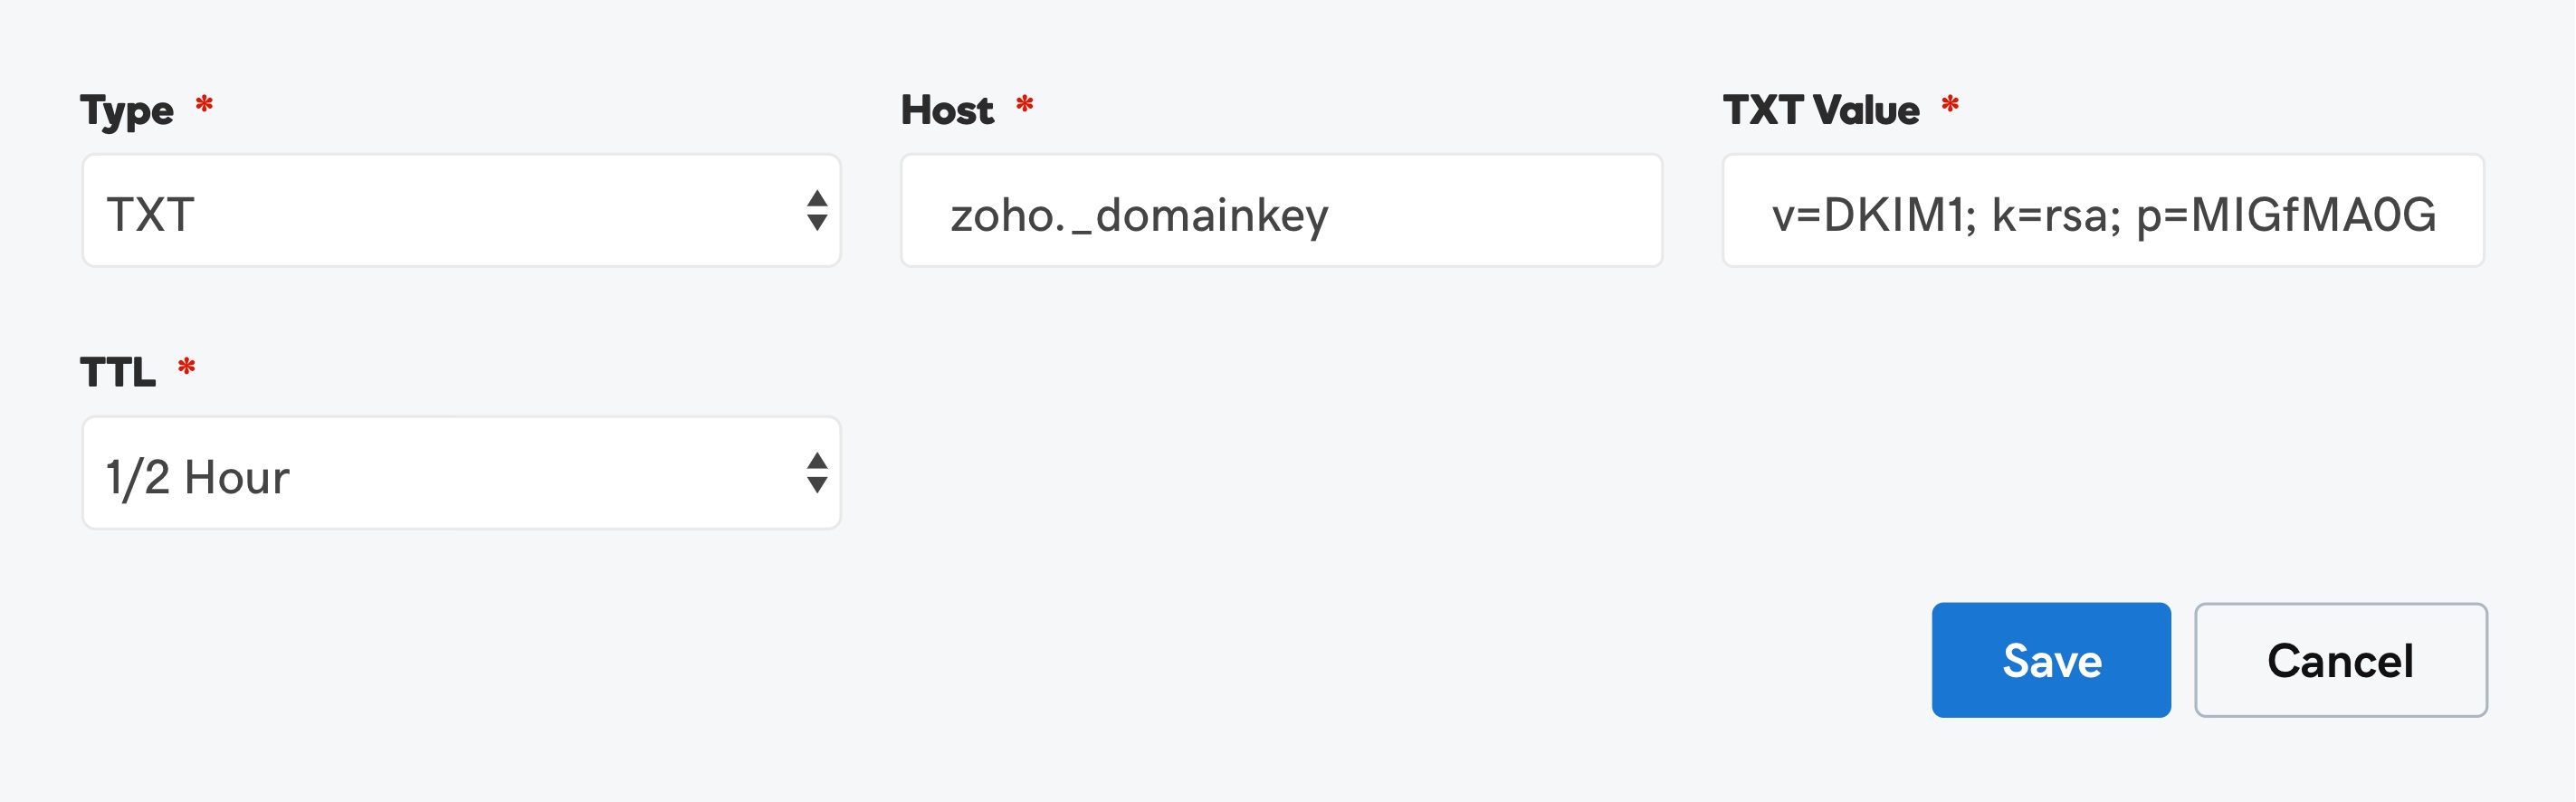
- Locate the option to add a TXT record, then click Add and select TXT from the drop-down list.
- For the Host field, copy the value "zmail._domainkey" (this will be different in the case of a different selector) from Zoho's Domain Setup page and paste it into your domain's DNS page.
- For the Points to/Value field, copy the value "v=DKIM1; k=r**; p=***************....****" from Zoho's Domain Setup page and paste it in your domain's DNS page.
- Once done, click Save Zone File, Save, or Add Records to save the changes.
- After adding the record, return to your Zoho Mail domain setup page and click Verify DKIM Record.
- Note:
- It may take time for the record to reflect. It is advised you wait for at least an hour before clicking Verify DKIM Record.
- It may take anywhere between 4 to 48 hours for your DKIM record to propagate.
- You can check the validity of your DKIM record here.
Email Migration
- When you switch from your previous email provider, you can migrate your data from the previous service provider to Zoho Mail using one of these available migration methods:
- IMAP/POP Migration
- Migration from G Suite
- Migration from Office 365
- Migration from Microsoft Exchange Server
- Zoho Exchange Migration Wizard
- Choosing the right type of migration to facilitate easy transfer is necessary. Learn more about Zoho Mail Migration. After choosing your preferred migration method,
- Note:
To migrate data from your previous email provider to the respective user accounts at Zoho Mail, user accounts need to be created in Zoho Mail before proceeding with the migration.
Mobile Access
- Zoho Mail has multiple apps designed for administrators on the go and for users to check their email anywhere, anytime. Zoho Mail's apps are,
- Zoho Mail Admin App
- Zoho Mail mobile app
- Note:
Learn more about mobile access here.
How To Create New Email Id In Zoho Mail
Source: https://www.zoho.com/mail/complete-guide-to-setup-zohomail.html
Posted by: starkqued1956.blogspot.com
0 Response to "How To Create New Email Id In Zoho Mail"
Post a Comment